Sambucus Syrup Recipe: Traditional Spiced Simmer
- Time: Active 5 minutes, Passive 45 minutes, Total 50 minutes
- Flavor/Texture Hook: Spiced, floral sweetness with a silky, tongue coating finish
- Perfect for: Cold season preparation, topping morning yogurt, or a thoughtful homemade gift
- Perfecting a Traditional Sambucus Syrup Recipe
- Batch Size and Timing Specifics
- Selecting Your Potent Natural Ingredients
- Essential Tools for Flavor Extraction
- Simmering Your Way to Flavor
- Fixing Texture and Taste Issues
- Clever Swaps and Flavor Variations
- Storage and Zero Waste Ideas
- Serving Your Homemade Herbal Syrup
- Recipe FAQs
- 📝 Recipe Card
Perfecting a Traditional Sambucus Syrup Recipe
The air in my kitchen changes the moment the cloves hit the water. It is a warm, woody scent that instantly pulls me back to my grandmother’s farmhouse, where a blue speckled pot was always simmering on the back burner during the damp November months.
I remember watching the dried, shriveled berries transform the clear water into a liquid that looked like midnight, thick and promising. Making a sambucus syrup recipe is not just about the final product, it's a ritual that connects us to generations of cooks who knew exactly how to shepherd their families through the winter.
We have all been there, standing in the pharmacy aisle, staring at those tiny bottles of elderberry syrup that cost more than a steak dinner. I remember the first time I made it myself, I was so nervous about "doing it wrong" that I boiled the honey along with the berries.
The result was a thin, sad syrup that lacked that vibrant, life giving kick. Since then, I have perfected the timing and the temperature, learning that the real magic happens when you let the heat do the hard work of extraction and let the honey bring the gentle, raw finish.
This recipe is about patience and layering. We start with the dried berries, which are little concentrated gems of flavor, and wake them up with a slow, steady heat. It's not a fast process, but it is a simple one.
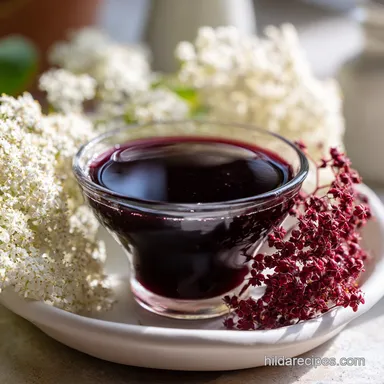
You'll see the water turn from a pale lilac to a deep, opaque violet that stains your wooden spoon, a sure sign that the good stuff is being released. We'll walk through exactly how to get that rich consistency without any artificial thickeners.
Batch Size and Timing Specifics
One of the most common questions I get from friends is about how much this actually makes. When you are dealing with a sambucus syrup recipe, the liquid reduces by almost half during the simmering stage. This concentration is vital for that punchy flavor we're after.
I've put together a quick guide so you can decide if you need to double the batch for a larger family or stick to this standard size.
| Servings | Water Amount | Dried Berries | Cook Time |
|---|---|---|---|
| 20 servings | 1.5 cups | 0.5 cup | 35 minutes |
| 40 servings | 3 cups | 1 cup | 45 minutes |
| 80 servings | 6 cups | 2 cups | 1 hours 10 mins |
This syrup is quite concentrated, so a standard serving is typically just one tablespoon. If you're looking for a breakfast pairing, this syrup is a lovely morning ritual alongside a Crispy Hash Browns recipe. The earthy tones of the potatoes contrast beautifully with the bright, spiced sweetness of the elderberries.
Selecting Your Potent Natural Ingredients
The quality of your ingredients is the only thing that stands between a mediocre syrup and a spectacular one. I always reach for dried Sambucus nigra (black elderberries) because they have a deeper, more complex profile than the red varieties.
If you can find them at a local herbalist or a reputable online shop, grab the organic ones. You want those berries to be the star of the show.
- 1 cup (100g) dried black elderberries: These are the backbone of the syrup. Why this? They provide the concentrated antioxidants and deep purple color.
- 3 cups (710ml) filtered water: Using filtered water ensures no chlorine taste interferes with the delicate berry notes.
- 2 tbsp fresh ginger, grated: This adds a necessary zing and warmth. Why this? Ginger provides a spicy counterpoint to the sweet honey.
- 1 cinnamon stick, crushed: Always use a whole stick rather than ground cinnamon to keep the syrup clear.
- 0.5 tsp whole cloves: These add a traditional, medicinal aroma.
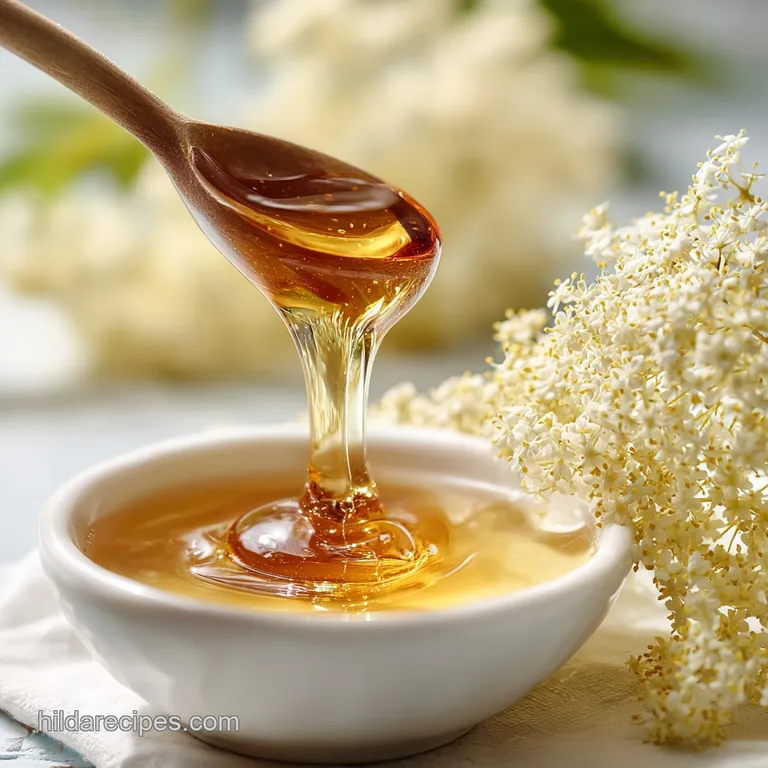
- 1 cup (340g) raw honey: This is our natural sweetener and preservative. Why this? Raw honey contains beneficial enzymes that over high heat processing destroys.
| Original Ingredient | Substitute | Why It Works |
|---|---|---|
| Raw Honey | Maple Syrup | Vegan alternative. Note: Results in a thinner syrup and lacks honey's specific enzymes. |
| Fresh Ginger | 1 tsp Ground Ginger | Use if fresh isn't available. Note: Flavor is more muted and can make the syrup cloudy. |
| Cinnamon Stick | 0.5 tsp Ground Cinnamon | Easier to find. Note: May leave a slightly gritty sediment at the bottom. |
Essential Tools for Flavor Extraction
You don't need a laboratory to make a high-quality syrup, but a few specific tools make the process much cleaner. I used to try straining the berries through a regular mesh sieve, but I always felt like I was leaving too much goodness behind. Now, I swear by a piece of cheesecloth or a clean nut milk bag.
It allows you to squeeze every last drop of that dark, velvety liquid out of the softened berries without getting any grit in your final jar.
The Science of Anthocyanin Extraction The dark purple color of the elderberry comes from anthocyanins, which are water soluble pigments. Heat Synergy: Simmering the berries at a consistent 190°F to 200°F breaks down the tough outer skins, allowing these pigments and their associated nutrients to fully infuse into the water.
Chef Tip: Toast your cinnamon stick and whole cloves in the dry pot for about 60 seconds before adding the water and berries. This "wakes up" the volatile oils in the spices, making the final syrup much more aromatic.
Simmering Your Way to Flavor

The magic of this recipe is in the reduction. We are essentially making a very strong decoction and then transforming it into a syrup. Follow these steps closely, especially the cooling part, because we want to protect the integrity of that raw honey.
- Combine ingredients. Place the dried elderberries, water, ginger, cinnamon, and cloves into a medium saucepan.
- Boil then simmer. Bring the mixture to a rolling boil, then immediately reduce the heat to low.
- Reduce the liquid. Simmer uncovered for 45 minutes until the liquid has reduced by half. Note: This ensures the flavor is concentrated enough to stand up to the honey.
- Mash the berries. Use the back of a large spoon or a potato masher to gently press the berries against the side of the pot.
- Remove from heat. Set the pot aside and let it sit for about 10 minutes to cool slightly.
- Strain the mixture. Pour the liquid through a fine mesh strainer lined with cheesecloth into a glass bowl.
- Squeeze for depth. Once cool enough to touch, gather the corners of the cheesecloth and squeeze the berries until every drop of dark juice is extracted.
- Final cooling. Let the concentrated juice cool down to lukewarm (about 100°F). Note: Adding honey to boiling liquid will kill the natural enzymes.
- Stir in honey. Add the raw honey and whisk steadily until the mixture is smooth and glossy.
- Bottle and store. Pour your finished syrup into a clean glass jar and cap it tightly.
If you're baking while your syrup simmers, try this drizzled over my Classic Buttery Shortbread recipe. The buttery flakes of the cookie soak up the syrup in the most delightful way, making it a sophisticated afternoon treat.
Fixing Texture and Taste Issues
Even with the best intentions, things can go a little sideways in the kitchen. The most common "mistake" I see is people panicking because the syrup looks too thin when it's still warm. Remember, honey thickens significantly as it cools in the fridge.
If you've followed the reduction step, your syrup will eventually have a beautiful, pourable consistency that isn't watery.
The Syrup is Too Thin
If you find that your syrup is still runny after 24 hours in the fridge, it usually means the water wasn't reduced enough before the honey was added. To fix this, you could technically simmer it again, but you would lose the raw honey benefits.
Next time, make sure you can see a visible "tide mark" on your pot where the water level has dropped by half.
Bitterness in the Finish
Elderberries have a natural earthy bitterness, but it shouldn't be overwhelming. If it is, you might have crushed the seeds too aggressively while straining. Those seeds contain tannins that can be quite astringent. Next time, a gentle squeeze is all you need.
| Problem | Root Cause | Solution |
|---|---|---|
| Mold Growth | Jar wasn't sterile or honey ratio was too low | Boil jars before filling and ensure a 1:1 or 1:2 honey to juice ratio. |
| Fermentation | Syrup left at room temperature | Keep refrigerated at all times; honey doesn't preserve it indefinitely once diluted. |
| Cloudy Syrup | Added ground spices instead of whole | Pour through a coffee filter to remove fine particles. |
Common Mistakes Checklist
- ✓ Never boil the honey; always wait until the juice is lukewarm to preserve the honey's natural properties.
- ✓ Use a heavy bottomed pot to prevent the berries from scorching at the bottom during the long simmer.
- ✓ Don't skip the "squeeze" step; the most potent part of the berry is in the pulp that gets caught in the cloth.
- ✓ Avoid using metal containers for long term storage; the acidity in the berries can react with certain metals.
- ✓ Always use a clean spoon when serving to prevent introducing bacteria into the jar.
Clever Swaps and Flavor Variations
While the classic spiced version is my favorite, I sometimes like to shake things up depending on what I have in the garden. If you want a brighter, more floral profile, you can add a tablespoon of dried rosehips or elderflowers to the simmering pot.
It changes the depth of the syrup and adds a lovely top note that feels very "English garden."
For those who find cloves too medicinal, you can swap them for star anise. This gives the syrup a subtle licorice finish that is absolutely stunning. If you are making this for kids who might be picky about the "earthy" taste, adding a few strips of orange zest to the simmer can make it much more approachable.
If you're looking for a different kitchen project to keep the momentum going, understanding your ingredients is key. You might find my guide on Salted Vs Unsalted recipe helpful for your other winter baking endeavors where precision really matters.
Storage and Zero Waste Ideas
This syrup doesn't have the same shelf life as a pure fruit jam because we haven't used massive amounts of sugar or a canning process. In the refrigerator, your homemade syrup will stay fresh and vibrant for about 2 to 3 months.
If you see any signs of bubbling or a sour smell, it has started to ferment and should be tossed.
For long term storage, I love using silicone ice cube trays. Freeze the syrup in one tablespoon increments. Once frozen, pop the "syrup cubes" into a freezer bag. They'll stay perfect for up to 6 months. When you need some, just drop a cube into a mug of hot water or tea for an instant spiced drink.
Zero Waste Tip: Don't throw those simmered berries away! Even after squeezing, they still have some flavor. I often put the spent berries back in the pot with a fresh cup of water and simmer them for 10 minutes to make a "secondary" tea.
It's lighter than the syrup but still delicious with a squeeze of lemon. You can also compost the berries, as they are a fantastic addition to your garden soil.
Serving Your Homemade Herbal Syrup
The most obvious way to use this is by the spoonful, but it is far more versatile than that. In our house, we treat it like a premium ingredient for our weekend breakfasts. It's much more interesting than plain maple syrup and feels a lot more special.
- The Morning Ritual: Stir a tablespoon into a bowl of warm oatmeal or swirl it through Greek yogurt.
- The Evening Refresher: Add a splash to sparkling water with a squeeze of lime for a sophisticated, non alcoholic spritzer.
- The Tea Booster: Whisk it into a cup of chamomile or peppermint tea before bed.
- The Glaze: Believe it or not, a tiny bit of this syrup whisked with a little balsamic vinegar makes an incredible glaze for roasted root vegetables.
One myth I want to clear up is that you can just eat raw elderberries. Please don't do that! Raw berries contain a component that can cause an upset stomach. The long simmering process in this recipe is what makes them safe and delicious.
Another common misconception is that this syrup is a "cure all." While it's a wonderful tradition, it’s best enjoyed as part of a balanced, cozy lifestyle. Trust the process, enjoy the aroma filling your home, and take pride in that beautiful purple jar sitting in your fridge.
It’s a little bit of summer’s sunshine, captured and kept for the colder days.

Recipe FAQs
How to make elderberry syrup?
Simmer dried elderberries, water, and spices for 45 minutes until reduced by half. Remove from heat, let cool slightly, then strain the liquid through cheesecloth, squeezing out all juice. Whisk in raw honey only when the liquid is lukewarm, then bottle and refrigerate.
What is Sambucus syrup used for?
It is traditionally used to support the immune system during cold and flu season. Many people take a spoonful daily or increase dosage when feeling unwell, often mixing it into tea or water.
How long does homemade elderberry syrup last?
Yes, it lasts about 2 to 3 months in the refrigerator. Because this recipe uses honey as a partial preservative and isn't canned, it requires constant refrigeration to maintain safety and quality.
How much homemade elderberry syrup per day when sick?
The standard recommendation is one tablespoon daily, increasing to three or four times a day when symptoms start. Always listen to your body, and remember this is a traditional food supplement, not a pharmaceutical treatment.
Is it true I must use dried berries?
No, fresh berries can be used, but you must adjust the water ratio. Use approximately one-third more water if starting with fresh berries, as they release significantly more moisture during the simmering process.
Can I substitute the honey with maple syrup?
Yes, you can use maple syrup, but the shelf life will be shorter. Maple syrup lacks the same enzymatic and preservative qualities that raw honey offers, resulting in a thinner consistency that keeps for less time.
Why is my finished syrup slightly cloudy?
This is often caused by adding ground spices instead of whole ones, or by insufficient cooling before adding honey. If you enjoyed mastering the precise extraction technique here, you can apply the same temperature control principles to ensure stability when making sauces, like in our Eggs Benedict with recipe.
Sambucus Syrup Recipe
Ingredients:
Instructions:
Nutrition Facts:
| Calories | 32 kcal |
|---|---|
| Protein | 0.1 g |
| Fat | 0 g |
| Carbs | 8.5 g |
| Fiber | 0.7 g |
| Sugar | 7.1 g |
| Sodium | 2 mg |
