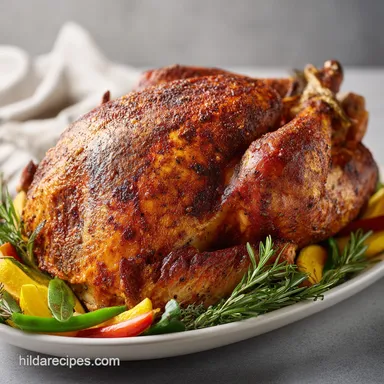
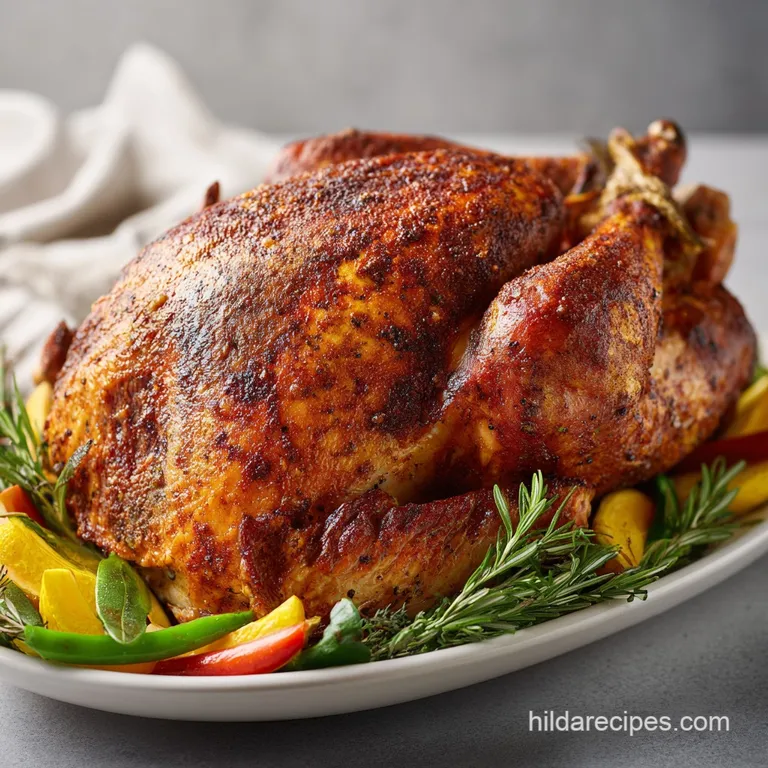
Oven Roasted Turkey Breast: Juicy and Golden
- Time: Active 40 minutes, Passive 75 minutes, Total 115 minutes
- Flavor/Texture Hook: Shatter crisp herb skin with velvety, succulent slices
- Perfect for: Sunday family dinner, holiday meal prep, or beginner cooks
- Achieving the Perfect Golden Skin Oven Roasted Turkey Breast
- Why the High Heat Blast Method Actually Works
- Component Analysis of the Roasted Turkey Ingredients
- Gathering Your Elements for a Flavorful Result
- Essential Tools for Your Roasting Journey
- Bringing the Roasted Turkey Breast to Life
- Solving Common Kitchen Hurdles for a Better Roast
- Personalizing Your Meal With These Creative Variations
- Strategies for Keeping Your Leftovers Fresh
- Serving Ideas to Make Every Single Bite Memorable
- Debunking Common Roasting Misconceptions
- Recipe FAQs
- 📝 Recipe Card
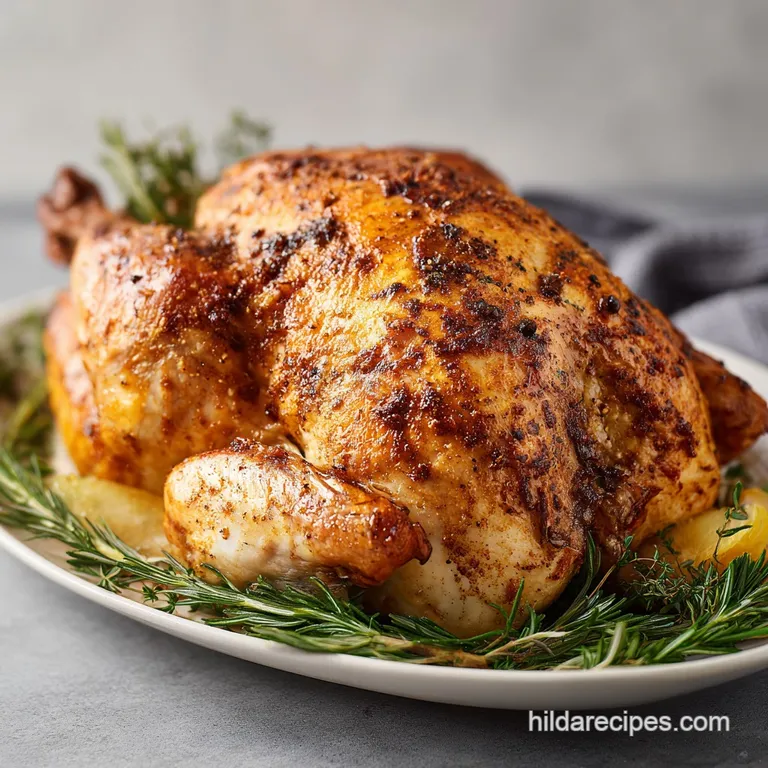
Achieving the Perfect Golden Skin oven roasted Turkey Breast
The kitchen is currently filled with the scent of woodsy rosemary and earthy sage, a fragrance that immediately transports me back to my grandmother’s Sunday table. There is a specific sound that happens when you pull a well roasted bird out of the oven a tiny, rhythmic crackle as the skin begins to tighten and settle in the cool air.
It is a promise of the texture to come, a warning that the "cook's treat" (that one crispy bit of skin near the wing joint) is ready to be claimed. This recipe isn't about the frantic energy of a massive holiday feast; it’s about the quiet, comforting joy of a meal that tastes like generations of perfected secrets.
Growing up, I watched my mother struggle with dry, flavorless poultry that required a lake of gravy just to swallow. I remember the frustration of a "perfect" looking bird that turned out to be sawdust on the inside.
We’ve all been there, hovering over a cutting board, hoping the center isn't pink but terrified it’s overcooked. This oven roasted Turkey Breast is my answer to those kitchen heartbreaks.
By focusing on a smaller cut and using a specific over high heat blast followed by a gentle finish, we create a contrast of textures that feels like a luxury restaurant meal but sits squarely in the realm of comfort food.
We are going for a sensory experience here the "shatter" of the skin under your knife, the velvety feel of the meat, and the deep, savory sizzle of the pan drippings hitting the broth.
This isn't just a recipe; it’s a way to bring that classic, nostalgic centerpiece back to your table without the three day stress of a full sized bird. It’s simple, honest, and quite honestly, it’s the only way I cook turkey anymore.
Let’s walk through how to make this work every single time, from the compound butter under the skin to the vegetable bed that creates the best pan sauce you’ve ever tasted.
Why the High Heat Blast Method Actually Works
Getting that restaurant quality finish at home usually comes down to managing moisture and heat transition. Most people roast at a steady temperature, which often results in skin that is rubbery by the time the internal meat reaches safety.
We are going to change that dynamic by using two distinct phases of cooking that respect the different needs of the skin and the muscle fibers.
- Thermal Shock for Texture: Starting at 425°F causes the moisture in the skin to evaporate rapidly, which is what creates that signature "shatter" texture rather than a chewy, leathery one.
- Fat Insulation Barrier: Tucking the herb butter directly against the meat creates a physical shield that prevents the lean breast meat from drying out while the skin browns.
- Aromatic Steam Chamber: The chicken broth and chopped vegetables in the bottom of the pan create a humid environment that keeps the underside of the breast succulent as it roasts.
- Enzymatic Resting Period: Allowing the meat to sit for 20 minutes isn't just a suggestion; it’s when the muscle fibers relax and reabsorb the juices that were pushed to the center during roasting.
| Method | Time | Texture | Best For |
|---|---|---|---|
| Traditional Low Roast | 2 hours 15 mins | Soft skin, evenly cooked | Beginners who are afraid of burning |
| High to Low Roast | 1 hour 15 mins | Shatter crisp skin, juicy | Achieving a professional, golden finish |
| Slow Cooker | 6 hours | No crispy skin, very soft | Shredded turkey or sandwiches |
| Spatchcocked | 55 minutes | Crispy skin, slightly uneven | Experienced cooks wanting speed |
This high to low temperature shift is the secret my aunt used for every family gathering. It mimics the environment of a professional rotisserie, giving the exterior the intensity it needs without punishing the delicate interior. If you want to dive deeper into preparation techniques, you might find my Turkey Brine recipe helpful for ensuring even more moisture before you even hit the oven.
Component Analysis of the Roasted Turkey Ingredients
When we look at the components of this dish, we aren't just looking at food; we are looking at how different fats and aromatics interact with the lean protein of the turkey breast. Each element has a specific job to do in the pan.
| Ingredient | Science Role | Pro Secret |
|---|---|---|
| Unsalted Butter | Provides the fat medium for browning and carries the herb flavors into the meat. | Use high-quality European butter for a lower water content and better browning. |
| Bone In Turkey Breast | The bone acts as a heat conductor, cooking the meat from the inside out and adding depth. | Always pat the skin with paper towels until it is tacky to ensure it crisps. |
| Fresh Sage & Rosemary | These hardy herbs contain oils that stand up to high heat without turning bitter. | Rub the herbs between your palms before chopping to "wake up" the aromatic oils. |
| Smoked Paprika | Provides a subtle base note and enhances the deep mahogany color of the finished skin. | Don't skip this; it provides the visual "wow" factor that looks like a magazine cover. |
The combination of these ingredients creates a flavor map that is balanced between the richness of the butter, the brightness of the herbs, and the savory depth of the roasted vegetables.
Gathering Your Elements for a Flavorful Result
To make this oven roasted Turkey Breast, you will need to gather a few specific items from your pantry and the produce aisle. I always recommend using fresh herbs here because the dried versions just don't have the same floral punch that makes the house smell like a holiday.
- 1 (3.5 lb) turkey breast: You can use bone in or boneless, but make sure it is thawed completely. Why this? Bone in stays juicier and provides better structure during the long roast.
- 1/2 cup (115g) unsalted butter: Make sure it is softened to room temperature. Why this? Soft butter mixes easily into a spreadable paste for the skin.
- 3 cloves garlic: Minced very finely. Why this? Finely minced garlic melts into the butter rather than burning in chunks.
- 1 tbsp (4g) fresh rosemary: Finely chopped. Why this? Rosemary provides a piney, robust backbone to the flavor profile.
- 1 tbsp (4g) fresh sage: Finely chopped. Why this? Sage is the quintessential poultry herb, offering an earthy, slightly peppery note.
- 1 tsp (2g) smoked paprika: For color and a hint of woodsmoke.
- 1.5 tsp (9g) kosher salt: Essential for drawing out flavor.
- 1 tsp (2g) cracked black pepper: For a mild, foundational heat.
- 2 large carrots: Roughly chopped for the roasting bed.
- 2 stalks celery: Roughly chopped for aromatics.
- 1 large yellow onion: Quartered to provide sweetness to the pan drippings.
- 1 cup (240ml) low sodium chicken broth: This prevents the drippings from burning.
| Original Ingredient | Substitute | Why It Works |
|---|---|---|
| Unsalted Butter | Ghee (Clarified Butter) | Higher smoke point, though you lose some of the milky toasted flavor. |
| Fresh Rosemary | Fresh Thyme | A softer, more floral herb profile that still pairs beautifully with poultry. |
| Chicken Broth | Dry White Wine (e.g., Pinot Grigio) | Adds a sophisticated acidity to the pan sauce. Note: Alcohol burns off. |
| Smoked Paprika | Regular Sweet Paprika | Provides the same color without the smoky undertone. |
Using the right substitutions can save a trip to the store, but I always suggest sticking to the fresh herbs if you can. The difference in the final aroma is significant.
Essential Tools for Your Roasting Journey
You don't need a professional kitchen to pull this off, but a few specific tools will make your life much easier and the results much more consistent. Honestly, don't even bother trying to guess the temperature a good thermometer is your best friend here.
- Heavy Roasting Pan or 12 inch Cast Iron Skillet: You want something that holds heat well. A heavy pan prevents the bottom vegetables from scorching.
- Instant Read Digital Thermometer: This is non negotiable. It’s the difference between juicy turkey and a dry disappointment.
- Small Mixing Bowl: For creating your herb compound butter.
- Paper Towels: I use a lot of these to get the skin as dry as possible.
- Sharp Carving Knife: To get those clean, beautiful slices without shredding the meat.
Chef's Tip: If you don't have a roasting rack, the bed of carrots, celery, and onions works even better. It lifts the meat so air can circulate, and the vegetables soak up the turkey fat, becoming a delicious side dish or the base for a gravy.
Bringing the Roasted Turkey Breast to Life
Now, let's get into the actual process. This is where the magic happens, and the smells in your kitchen will start to draw everyone in. Follow these steps closely, especially the part about drying the skin it is the secret to that golden color.
- Pat the turkey breast extremely dry with paper towels to ensure crispy skin. Note: Any moisture left on the skin will cause it to steam rather than sear.
- Using your fingers, gently separate the skin from the meat to create a pocket for the compound butter. Note: Be careful not to tear the skin; you want a snug pocket to hold the flavor.
- In a small bowl, combine softened butter, minced garlic, rosemary, sage, smoked paprika, salt, and pepper.
- Stuff two thirds of the herb butter directly onto the meat under the skin, then slather the remaining butter over the outside.
- Preheat oven to 425°F (220°C). Arrange carrots, celery, and onion in a roasting pan and pour in the broth.
- Place the turkey breast on the bed of vegetables. Roast at 425°F for 15 minutes until the skin is beginning to turn a light golden brown.
- Reduce oven temperature to 325°F and continue roasting until an instant read thermometer reaches 165°F in the thickest part (approximately 1 hour additional).
- Remove from oven and let rest for 20 minutes until the juices have settled and the meat feels firm but yielding.
The contrast between the initial high heat and the subsequent slow roast is what creates that "best of both worlds" texture. While the turkey is resting, you can use the leftover meat for something creative like my Turkey a la King if you happen to have a larger bird or a lot of leftovers.
Solving Common Kitchen Hurdles for a Better Roast
Even with the best intentions, things can sometimes go sideways in the kitchen. Turkey is a lean meat, which means it is less forgiving than a fatty pot roast. But what about the sogginess? Or the skin that just won't brown? We'll get to that.
Why Your Skin Isn't Getting Crispy
If your turkey looks pale and feels soft, the most likely culprit is moisture. If the skin wasn't dried thoroughly, or if the oven wasn't fully preheated to 425°F, the fat can't do its job of frying the skin.
Another issue could be the roasting pan itself; if the sides are too high, they trap steam around the bird.
Why the Meat Feels Dry
Overcooking is the number one enemy. Once turkey breast passes 165°F, the proteins tighten and squeeze out all the moisture. If you don't use a thermometer, you're just guessing, and turkey isn't a meat you want to gamble with.
Also, skipping the resting period is a common mistake I once made the juices literally run right out onto the cutting board if you slice it too soon.
| Problem | Root Cause | Solution |
|---|---|---|
| Rubbery Skin | Excess moisture or low initial heat. | Pat dry until tacky and ensure the oven is at 425°F before the bird goes in. |
| Dry/Bland Meat | Overcooking or lack of seasoning under the skin. | Use a thermometer to hit 165°F exactly and always put butter under the skin. |
| Burnt Pan Drippings | Not enough liquid in the roasting pan. | Add a splash more broth or water if the pan looks dry during the roast. |
Common Mistakes Checklist
- ✓ Pat the turkey completely dry (I mean really dry) before adding any butter.
- ✓ Ensure your butter is truly soft so it doesn't clump under the skin.
- ✓ Don't forget to let the oven preheat for at least 20 minutes before starting.
- ✓ Resist the urge to open the oven door constantly; you lose 25 degrees every time.
- ✓ Always check the temperature in the thickest part of the meat, avoiding the bone.
- ✓ Let it rest! Set a timer for 20 minutes and walk away from the bird.
Personalizing Your Meal With These Creative Variations
While the traditional herb butter is my favorite, you can easily adapt this oven roasted Turkey Breast to suit different flavor profiles. The technique remains the same, but the "soul" of the dish can change with just a few swaps.
- For a Citrus Twist: Add the zest of one lemon and one orange to the butter mixture. Use a few slices of the fruit inside the roasting pan bed for a bright, acidic aroma.
- For a Spicy Kick: Swap the smoked paprika for chipotle powder and add a teaspoon of honey to the butter. This creates a sweet heat glaze that is incredible.
- The Mediterranean Version: Use dried oregano instead of sage and replace half the butter with a high-quality olive oil. Add some Kalamata olives to the roasting bed.
- For a dairy-free Version: Use a high-quality plant based butter or even duck fat. Duck fat, in particular, creates an incredibly crispy skin that is rich and savory.
Decision Shortcut
- If you want maximum flavor intensity, double the garlic and herbs in the butter.
- If you want the easiest cleanup, line your roasting pan with heavy duty foil before adding the vegetables.
- If you want the best gravy, use a high-quality bone broth instead of store-bought chicken broth.
Strategies for Keeping Your Leftovers Fresh
Storing your oven roasted Turkey Breast correctly is the difference between a sad, dry sandwich and a "better than deli" experience the next day. I actually love the leftovers almost as much as the main meal because the flavors have time to truly meld.
Fridge Storage: Once the turkey has cooled completely, wrap it tightly in plastic wrap or store it in an airtight container. It will stay fresh for up to 4 days. I like to keep the slices submerged in a little bit of the leftover pan juices to keep them from drying out in the refrigerator's cold air.
Freezing Guidelines: You can freeze the cooked turkey for up to 3 months. Slice the meat first, then lay it flat in a freezer safe bag. Squeeze out as much air as possible to prevent freezer burn.
When you're ready to eat it, thaw it overnight in the fridge never use the microwave to thaw turkey if you want to keep the texture velvety.
Zero Waste Tip: Don't you dare throw away that turkey bone or the roasted vegetables! Throw the bone, the onion quarters, the carrots, and the celery into a pot with some water and peppercorns. Simmer it for 4 hours, and you'll have a turkey stock that puts the boxed stuff to shame.
Serving Ideas to Make Every Single Bite Memorable
How you serve this bird is just as important as how you cook it. Since we've worked so hard on that skin, you want to showcase it. I like to carve the breast into thick, half inch slices across the grain. This ensures every bite is tender and includes a little piece of that golden, herb crusted skin.
The "Better Than Deli" Sandwich: Pile cold turkey slices onto a crusty baguette with some cranberry sauce, a smear of brie, and a handful of arugula. The bitterness of the greens cuts through the richness of the butter roasted meat perfectly.
The Power Bowl: If you're looking for something lighter, chop the turkey and toss it with roasted sweet potatoes, kale, and a maple dijon vinaigrette. It’s a healthy way to use up those last few bits of meat that aren't quite enough for a full meal.
The Classic Plate: Serve it alongside some garlic mashed potatoes and those roasted carrots from the pan. Pour the pan juices (the "jus") directly over the meat right before serving. It’s simple, elegant, and reminds me of every great Sunday dinner we've ever had.
Trust me on this: the pan juices are liquid gold. Don't let them go to waste.
| Comparison | Fresh Roasted Turkey | Pre Cooked/Shortcut Turkey |
|---|---|---|
| Texture | Firm but succulent with crispy skin | Often spongy or overly salty |
| Aroma | House smells like fresh herbs and butter | Minimal aroma or "reheated" scent |
| Flavor | Layered herbs, garlic, and natural poultry | One dimensional, heavy on preservatives |
Debunking Common Roasting Misconceptions
There are a few myths that persist in the world of poultry roasting that I really want to clear up. First, basting the turkey while it's in the oven does not actually make the meat juicier. In fact, every time you open the oven to baste, you're dropping the temperature and letting moisture escape.
The butter under the skin is what provides the moisture, not the juices you ladle on top.
Another myth is that you need to cook turkey until the juices run clear. While that's a decent visual cue, it's not scientific. Depending on the bird, juices can sometimes still have a pinkish hue even when the meat is safely at 165°F.
Relying on an instant read thermometer is the only way to be 100% sure you aren't serving dry meat or an unsafe meal.
Finally, some people think that you should wash your turkey before roasting it. Please, don't do this! Washing the turkey just splashes bacteria all over your sink and counters. The heat of a 425°F oven is more than enough to kill anything on the surface.
Just pat it dry with paper towels and get to roasting. Your kitchen and your turkey skin will thank you. Enjoy the process, and more importantly, enjoy that first, perfect, crispy bite!
Recipe FAQs
How long will a 5 lb turkey breast take to cook?
Plan for roughly 90 to 100 minutes of total roasting time. While a standard 3.5 lb breast takes about 75 minutes, a larger 5 lb cut requires additional time in the 325°F oven to ensure the center reaches the required 165°F.
What is the best temperature to roast a turkey breast in the oven?
Start at 425°F then reduce to 325°F. This dual temperature approach browns the skin quickly during the first 15 minutes and allows the meat to finish gently without drying out.
Do I cover a turkey breast when roasting it?
No, keep it uncovered throughout the entire process. Leaving the turkey breast exposed to the oven air is essential to achieving that signature shatter crisp skin texture.
How to make a 3 lb turkey breast in the oven?
Pat the breast dry and stuff herb butter under the skin. Arrange your carrots, celery, and onion in a roasting pan with the chicken broth, then roast at 425°F for 15 minutes before dropping the heat to 325°F until a thermometer reads 165°F.
Is it true I should slice the turkey immediately after taking it out of the oven?
No, this is a common misconception. You must let the meat rest for 20 minutes before carving to allow the juices to redistribute, ensuring every slice remains moist.
How can I make sure the skin gets crispy without burning the bottom?
Use the vegetable bed to elevate the meat. Placing the turkey on a layer of carrots, celery, and onion keeps it out of the direct broth, allowing the heat to circulate evenly for a perfect crust. If you enjoyed mastering this high heat searing technique, you can apply the same logic to our healthy chicken parmesan for a superior exterior.
How to check if the turkey is done without overcooking it?
Insert an instant read thermometer into the thickest part of the breast. Pull the turkey out of the oven the moment it registers 165°F to maintain the ideal velvety texture of the meat.
oven roasted Turkey Breast