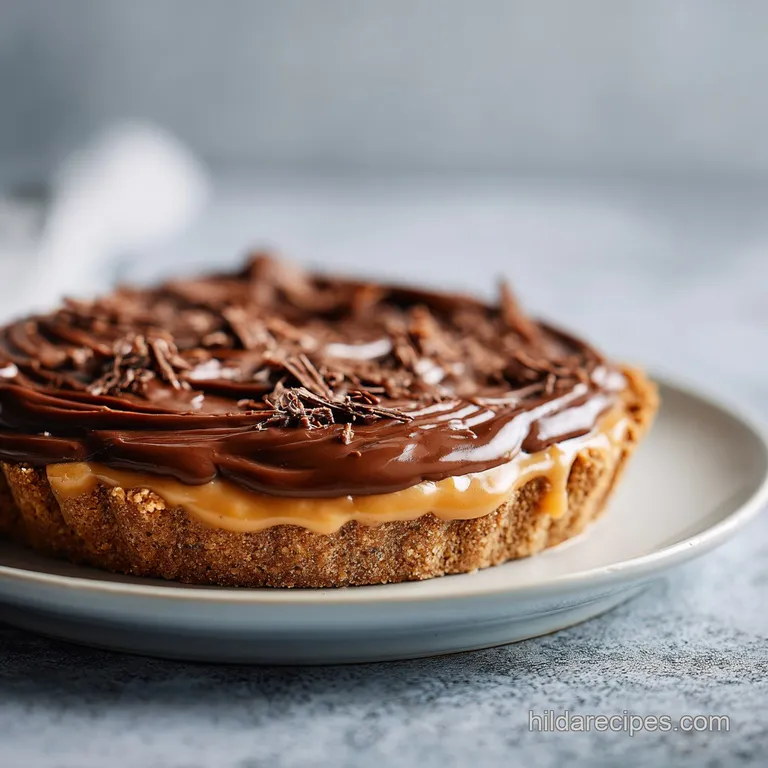
Chocolate Peanut Butter Caramel Mousse Pie
- Time: Active 20 minutes, Passive 1 hours, Total 1 hours 20 mins
- Flavor/Texture Hook: A velvety peanut butter cloud paired with a shatter crisp chocolate crust.
- Perfect for: Holiday gatherings, Sunday family dinners, or a high reward weekend project.
- Mastering the Triple Layer Chocolate Peanut Butter Caramel Mousse Pie
- Key Preparation Stats for Your Success
- Selecting the Finest Elements for Flavor
- Tools Required for a Velvety Result
- Detailed Steps for a Flawless Finish
- Solving Common Textural Hurdles in Baking
- Modifications for Various Dietary Needs and Preferences
- Debunking Common Dessert Myths
- Proper Cooling and Long Term Storage Methods
- Enhancing Your Dessert with Thoughtful Pairings
- Recipe FAQs
- 📝 Recipe Card
Mastering the Triple Layer Chocolate Peanut Butter Caramel Mousse Pie
Imagine the sound of a fork hitting a chocolate crust a satisfying, sharp snap followed by the resistance free glide through a cloud of peanut butter mousse. That first bite hits you with the deep cocoa of the cookies, then the punch of salt from a hidden caramel layer, and finally, the cooling, silky finish of the cream.
It is the kind of dessert that makes a room go silent, save for the occasional clink of silverware.
I remember the first time I attempted a version of this for a family reunion. I was so worried about the mousse collapsing that I over whipped the cream into a grainy mess. I learned the hard way that patience and temperature are your best friends in the kitchen.
This recipe is the result of those little failures, refined into a method that works every single time, even if you’ve never made a mousse in your life.
We aren't just throwing ingredients together; we're building layers of memories. My grandmother always said that the best recipes are the ones that balance the sweet with enough salt to keep you coming back for "just one more sliver." This pie does exactly that.
It's a heavy hitter in terms of flavor, but the texture stays light enough that you won't feel weighed down after a slice.
Key Preparation Stats for Your Success
Success in the kitchen often comes down to understanding the variables before you even turn on the mixer. When we talk about a mousse based dessert, the environment matters just as much as the ingredients.
Ensuring your kitchen isn't too hot and your cream is straight from the fridge will determine if your filling is a fluffy cloud or a puddle.
Stabilization: Cream cheese provides a structural backbone that prevents the whipped heavy cream from deflating over time.
Salted Contrast: The 1/4 tsp of sea salt in the crust is vital to cut through the richness of the peanut butter and caramel.
Thermal Shock: Using cold heavy cream is non negotiable for achieving the maximum volume during the whipping process.
Texture Layering: The crushed peanuts in the caramel layer add a necessary "crunch" factor to break up the soft mousse.
| Texture Goal | Chilling Time | Temperature | Visual Cue |
|---|---|---|---|
| Soft & Spoonable | 2 hours | 40°F (Fridge) | Mousse holds a soft peak |
| Sliceable & Firm | 4 hours | 38°F (Fridge) | Clean edges when cut |
| Ice Cream Style | 6 hours | 0°F (Freezer) | Firm like a frozen truffle |
While a shorter chill time works if you're in a rush, giving the pie a full four hours in the fridge allows the flavors to meld. The caramel settles into the crust, and the mousse sets into a firm, velvety consistency that looks beautiful on a dessert plate.
Selecting the Finest Elements for Flavor
Choosing the right components is the first step toward a result that tastes like it came from a professional bakery. We aren't looking for the most expensive brands, but rather the right textures.
For instance, a natural, oil separated peanut butter won't work here because it lacks the necessary emulsifiers to keep the mousse stable. Stick to a standard creamy variety for that signature silkiness.
| Ingredient | Science Role | Pro Secret |
|---|---|---|
| Heavy Cream (1.5 cups) | Aeration | Use a chilled bowl to reach peak volume faster. |
| Cream Cheese (8 oz) | Structural Anchor | Must be softened to prevent lumps in the mousse. |
| Chocolate Cookies (260g) | Foundation | Pulse into fine crumbs so the crust doesn't crumble. |
| Powdered Sugar (1 cup) | Stability | Sifting prevents tiny white sugar pockets in the filling. |
If you find yourself running low on chocolate sandwich cookies, you can easily pivot. This technique for a sturdy base is quite similar to the one used in my Classic Buttery Shortbread recipe, where fat and crumbs create a reliable, delicious foundation.
Tools Required for a Velvety Result
You don't need a kitchen full of gadgets, but a few specific tools will make your life much easier. A 9 inch deep dish pie plate or a springform pan is best for this volume of filling. If you use a standard shallow pie tin, you might have leftover mousse which, honestly, isn't the worst problem to have.
- Stand Mixer or Hand Mixer: Essential for whipping the heavy cream to the right consistency.
- Food Processor: This ensures your chocolate cookies are turned into a fine, sandy dust for a cohesive crust.
- Rubber Spatula: Crucial for folding the whipped cream into the peanut butter mixture without deflating all the air you just worked so hard to incorporate.
- Offset Spatula: This helps you get those beautiful, swooping peaks on top of the pie.
Chef's Note: If you don't have a food processor, place the cookies in a heavy duty freezer bag and crush them with a rolling pin. It’s a great way to get out some frustration, just make sure the crumbs are very fine so the crust holds together!
Detailed Steps for a Flawless Finish
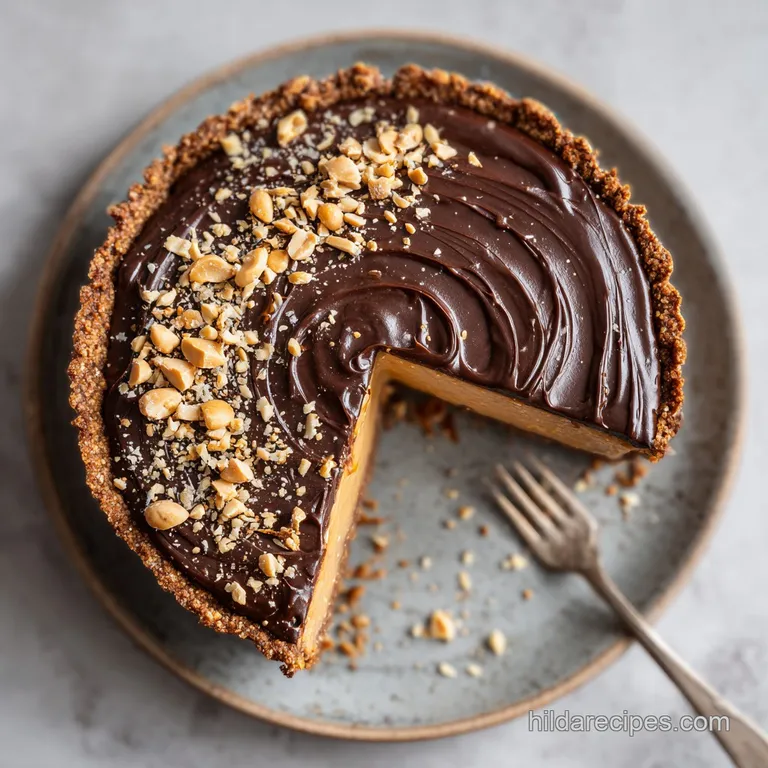
For the Shattering Crust
- Pulse the cookies. Place 24 chocolate sandwich cookies in a food processor and blend until they resemble fine sand.
- Combine with fat. Add 5 tbsp of melted unsalted butter and 1/4 tsp fine sea salt, pulsing until the mixture looks like wet sand.
- Press and set. Firmly press the crumbs into the bottom and up the sides of a 9 inch pie dish. Note: Use the bottom of a measuring cup to get a flat, even surface.
- Quick bake. Bake at 350°F (180°C) for 8 minutes until you smell a deep, toasted cocoa aroma. Let it cool completely.
For Salted Caramel Core
- Layer the caramel. Spread 1/2 cup thick salted caramel sauce over the cooled crust.
- Add the crunch. Sprinkle 1/4 cup crushed roasted peanuts over the caramel. Note: This prevents the caramel from sliding when you slice the pie.
For Velvety Peanut Mousse
- Cream the base. Beat 8 oz softened cream cheese, 1 cup creamy peanut butter, 1 cup sifted powdered sugar, and 1 tsp vanilla extract until the mixture is pale and smooth.
- Whip the cream. In a separate chilled bowl, whip 1.5 cups cold heavy whipping cream until stiff peaks form.
- Fold gently. Take a third of the whipped cream and stir it into the peanut butter base to lighten it. Gently fold in the remaining cream until no white streaks remain.
- Final chill. Spread the mousse over the caramel layer and refrigerate for at least 4 hours.
For Mahogany Chocolate Ganache
- Melt and pour. Heat 1/4 cup heavy cream until steaming, pour over 1/2 cup semi sweet chocolate chips, let sit for 2 minutes, then stir until glossy and dark. Drizzle over the chilled pie before serving.
| Original Ingredient | Substitute | Why It Works |
|---|---|---|
| Heavy Cream | Coconut Cream (full fat) | High fat content allows for whipping. Note: Adds a tropical flavor. |
| Chocolate Cookies | Graham Crackers | Provides a honey sweet base. Note: Less bitter than cocoa cookies. |
| Salted Caramel | Butterscotch Sauce | Similar viscosity. Note: Lacks the salt forward punch of caramel. |
This recipe is incredibly versatile. If you are looking for another high impact, low stress treat, you might enjoy the process of my No Bake Chocolate recipe, which uses similar layering principles to achieve a crowd pleasing result.
Solving Common Textural Hurdles in Baking
Mousse is Grainy
If your filling looks curdled or grainy, it’s usually because the heavy cream was over beaten or the cream cheese was too cold when you started. When cold cream cheese meets other ingredients, it breaks into tiny firm bits that are impossible to smooth out later.
Always ensure the cheese is at room temperature but still holds its shape.
Crust Crumbles When Slicing
A crust that falls apart usually lacks enough "glue." This is either from not pressing the crumbs firmly enough into the pan or not using enough butter. Make sure you really pack those crumbs down if they feel loose before they go into the oven, they will be loose when you try to eat them.
| Problem | Root Cause | Solution |
|---|---|---|
| Runny Mousse | Under whipped cream | Beat the cream until it holds stiff, upright peaks. |
| Soggy Crust | Caramel was too thin | Use a thick, cold set caramel sauce, not a thin topping syrup. |
| Lumpy Filling | Cold cream cheese | Ensure cheese is soft enough to spread like butter before mixing. |
Common Mistakes Checklist
- ✓ Ensure the mixing bowl for the heavy cream is chilled for at least 10 minutes.
- ✓ Sift the powdered sugar to avoid "sugar bumps" in the silky mousse.
- ✓ Don't skip the 8 minute bake for the crust; it toasts the cocoa and prevents sogginess.
- ✓ Use a hot knife (dipped in warm water and wiped dry) to get clean slices through the caramel.
- ✓ Let the ganache cool for 5 minutes before drizzling so it doesn't melt the mousse.
Modifications for Various Dietary Needs and Preferences
You can easily adapt this chocolate peanut butter caramel mousse pie to fit different lifestyles. For a gluten-free version, swap the sandwich cookies for a gluten-free brand; most major grocery stores carry them now. The filling itself is naturally gluten-free as long as your vanilla extract and caramel are certified.
Scaling the Recipe
- To Scale Down (1/2 recipe): Use a 6 inch springform pan. Keep the crust bake time the same, but check the mousse at 2 hours of chilling.
- To Scale Up (2x recipe): Use two 9 inch pans rather than one giant one. This ensures the mousse sets properly in the center. Reduce the salt in the second crust to 1/8 tsp to avoid over seasoning.
- Baking Adjustments: If you decide to double the crust and bake in a larger rectangular pan, lower the oven temp to 325°F (160°C) and extend the time by 4 minutes to ensure even toasting without burning the edges.
If you find yourself with extra chocolate cookies from a large pack, they make a fantastic base for other treats. You can even use them in a Carrot Cake Ice recipe for a fun, crunchy mix in that kids will absolutely love.
Debunking Common Dessert Myths
One of the biggest misconceptions is that you need gelatin to make a mousse pie sliceable. While gelatin provides a very firm, rubbery set, the combination of high fat cream cheese and whipped heavy cream creates a "fat stable" mousse that holds its shape beautifully while remaining melt in-the mouth soft.
Another myth is that "natural" peanut butter is better for baking. In this specific case, it’s actually the opposite. The oils in natural peanut butter can separate when mixed with dairy, leading to a greasy texture.
The stabilizers in brands like Jif or Skippy are what give this mousse its signature velvety finish.
Proper Cooling and Long Term Storage Methods
This pie is a champion of make-ahead desserts. You can keep it in the refrigerator for up to 4 days, covered loosely with plastic wrap or a pie dome. In fact, the flavor often improves after 24 hours as the salt in the caramel migrates slightly into the mousse.
For long term storage, this pie freezes beautifully. Wrap the entire pie (without the ganache drizzle) in a double layer of plastic wrap and then foil. It will stay fresh for up to 2 months. To serve, thaw it in the fridge overnight.
If you're looking for a creative way to use leftovers, you can scoop slightly softened pie into a blender with some milk for the most decadent milkshake you've ever tasted.
Enhancing Your Dessert with Thoughtful Pairings
While this pie is a star on its own, a few simple additions can take it to the next level. A dollop of unsweetened whipped cream helps balance the intense sweetness of the caramel.
If you want to lean into the saltiness, a light sprinkle of Maldon sea salt flakes over the ganache drizzle adds a sophisticated "crunch" and a visual pop.
For a drink pairing, a dark roast coffee or a cold glass of whole milk is the traditional choice. If you're serving this at a dinner party, a small glass of tawny port or a nutty sherry complements the roasted peanut flavors perfectly.
The goal is to provide a slightly bitter or acidic counterpoint to the rich, fatty layers of the pie.
If you enjoy the combination of creamy fillings and crunchy bases, you might find inspiration in my Homemade Angel Food recipe, which offers a much lighter, airier alternative for those hot summer days when a rich mousse feels like too much.

Recipe FAQs
Can I substitute natural, oil-separated peanut butter for creamy processed peanut butter?
No, stick to creamy processed peanut butter. Natural peanut butter often separates when mixed with the dairy components, leading to a greasy texture instead of the required smooth, stable mousse base.
How to ensure the mousse is sliceable and doesn't collapse in the fridge?
Chill the pie for a minimum of four hours. The structural integrity comes from the stabilized fat content of the cream cheese combined with fully whipped heavy cream folded in gently.
What is the key technique to achieve maximum volume when whipping the heavy cream?
Use a chilled bowl and very cold cream. Chilling your mixing bowl and whisk attachment for at least ten minutes helps the fat molecules solidify slightly, allowing them to trap air more efficiently.
How to get perfectly clean slices through the caramel layer without pulling up the crust?
Dip your knife in hot water and wipe it dry between each cut. This thermal shock melts the sticky caramel just enough to allow the knife to glide cleanly through the filling and the crust base.
How to make the chocolate cookie crust less likely to crumble when cut?
Press the crumbs very firmly into the pie plate and pre-bake for 8 minutes. Baking the crust toasts the cocoa solids, setting the butter binder more securely, similar to how fat sets the foundation in our No Bake Chocolate recipe.
Is it true you must use gelatin to stabilize a mousse style pie filling?
No, gelatin is unnecessary for this style of pie. The combination of room temperature cream cheese and fully whipped heavy cream provides enough structure to create a fat-stable mousse that holds its shape.
What is the best way to store leftovers for maximum freshness?
Cover loosely and refrigerate for up to four days. The pie freezes very well; wrap it tightly in plastic and foil, omitting the top ganache layer, and thaw in the refrigerator overnight.
Chocolate Peanut Butter Caramel Mousse Pie

Ingredients:
Instructions:
Nutrition Facts:
| Calories | 752 calories |
|---|---|
| Protein | 12 g |
| Fat | 56 g |
| Carbs | 58 g |
| Fiber | 3.5 g |
| Sugar | 42 g |
| Sodium | 390 mg |
