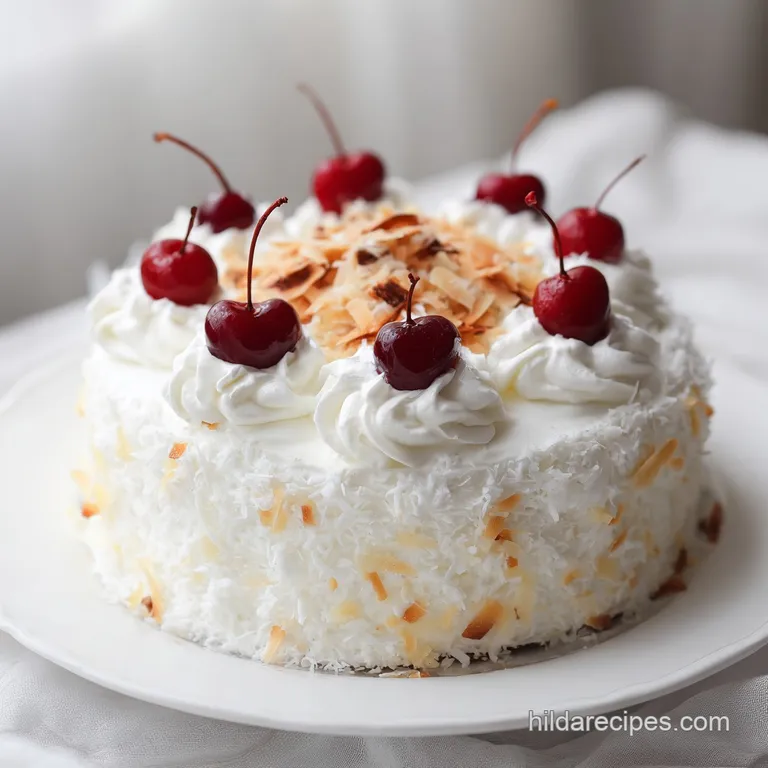
Coconut Cream Cake: Moist and Silky
- Time: Active 30 minutes, Passive 35 minutes, Total 65 minutes
- Flavor/Texture Hook: Silky, snow capped, and moisture saturated
- Perfect for: High stakes celebrations or technical baking practice
- Master Science of Coconut Cream Cake
- Technical Specs for Baking Precision
- Molecular Role of Primary Ingredients
- Essential Laboratory Gear for Baking
- Step-by-Step Technical Execution Protocol
- Structural Failure Analysis and Repairs
- Formula Adaptations and Flavor Shifts
- Preservation and Storage Stability Guidelines
- Optimal Presentation and Serving Dynamics
- Why pay $15 a slice at a bistro?
- Kitchen Myths and Misconceptions
- Recipe FAQs
- 📝 Recipe Card
Master Science of Coconut Cream Cake
The air in my kitchen changes the second the oven door opens. It is not just the smell of sugar; it is the specific, fatty aroma of toasted coconut oils meeting the steam of a rising sponge.
I remember the first time I got this right the cake was so heavy with its coconut milk soak that it felt like a structural risk, but as it cooled, the starches locked that moisture into place. The result was a velvety texture that felt less like bread and more like a dense, chilled custard.
We are moving away from the "guesswork" of home baking. Most recipes for a Coconut Cream Cake rely on luck or excessive sugar to hide a dry crumb, but we are going to use specific hydration ratios and temperature control.
We are aiming for a cake that shatters the expectation of what a "simple" dessert can be, focusing instead on the precise interaction between the medium chain triglycerides in the coconut milk and the gluten network of our flour.
Precision is our primary tool here. When we talk about 225g of butter, we aren't suggesting a ballpark figure; we are identifying the exact fat to flour ratio required to coat the proteins and prevent over development of gluten. This ensures that every bite is silky rather than chewy.
You'll find that this approach removes the frustration of "hit or miss" baking and replaces it with a predictable, high-quality outcome every single time.
Technical Specs for Baking Precision
To understand why this specific Coconut Cream Cake formula succeeds, we must look at the mechanics of the bake. We aren't just heating batter; we are initiating a series of chemical reactions that depend on the timing of our "soak" and the stability of our fats.
The coconut milk provides a unique fat structure that behaves differently than dairy, requiring a specific creaming time to ensure the air bubbles are small and uniform.
- Fat Coating Mechanism: Creaming the butter and sugar for exactly 5 minutes creates a mechanical aeration that provides the cake’s primary lift before the chemical leaveners even activate.
- Starch Gelatinization Control: The addition of the three milk soak while the cake is warm (not hot) allows the liquid to migrate into the center of the crumb via capillary action before the crumb sets completely.
- Protein Denaturation: Using room temperature eggs ensures the emulsion doesn't "break," which would lead to a greasy, dense layer at the bottom of your pans.
- Osmotic Saturation: The sugar in the cream of coconut helps draw the moisture into the starch cells of the baked cake, effectively "plumping" the crumb without dissolving it.
| Method | Total Time | Resulting Texture | Best Application |
|---|---|---|---|
| Fast (Poke style) | 45 minutes | Very wet, pudding like | Casual family meals |
| Classic (Layered) | 65 minutes | Balanced, velvety, sturdy | Formal events/Slicing |
| Chilled (24 hour) | 24+ hours | Firm, deeply infused | make-ahead prep |
The difference between a "good" cake and a scientifically sound one lies in these timing windows. For instance, waiting more than 10 minutes to apply the soak will result in the surface tension of the cake becoming too high, causing the liquid to pool on top rather than being absorbed. If you are looking for a different profile for another occasion, you might find my Best Yellow Cake Recipe useful for its similar focus on crumb precision.
Molecular Role of Primary Ingredients
Every component in this recipe serves a technical purpose. We aren't just adding "coconut flavor"; we are manipulating the moisture content and the structural integrity of the cake through specific ingredient choices.
The use of all purpose flour at 375g provides enough protein to hold the weight of the soak without collapsing, while the 120ml of cream of coconut provides the necessary viscosity for the infusion.
| Ingredient | Science Role | Pro Secret |
|---|---|---|
| Unsalted Butter | Interrupts gluten | Use 18°C butter for the best aeration |
| Coconut Milk | Provides emulsified fats | Canned full fat is mandatory for stability |
| Cream of Coconut | High viscosity hydrator | Whisk before measuring to re incorporate fats |
| Large Eggs | Structural emulsifier | Room temperature prevents the batter from curdling |
Choosing the right ingredients is half the battle. If you've ever wondered why some cakes feel dry despite having "plenty of oil," it's usually because the hydrator didn't have the right viscosity to penetrate the crumb.
The evaporated milk in our soak adds solids without the excess water found in regular milk, which is why the cake remains "moist" rather than "soggy."
Essential Laboratory Gear for Baking
To achieve the results we're looking for, specific tools are non negotiable. A stand mixer with a paddle attachment is necessary because manual whisking cannot provide the consistent mechanical force needed to cream butter and sugar for a full 5 minutes.
Without this, the air pockets in your cake will be irregular, leading to a "holey" or tunneling texture.
You also need two 9 inch (23cm) round cake pans. Using a single deep pan will alter the thermodynamics of the bake; the edges will overcook and become dry before the center reaches the 98°C required for the internal crumb to set.
Parchment paper is also a technical requirement here the high sugar content of the soak makes the layers incredibly sticky, and without a physical barrier, you will lose the bottom of your cake to the pan.
Chef's Note: If your kitchen is particularly warm, chill your mixer bowl and paddle for 10 minutes before starting the frosting. This prevents the fats in the cream cheese and butter from reaching their melting point, ensuring the frosting holds its peak.
step-by-step Technical Execution Protocol
1. Preparation of the airy foundation
Begin by preheating your oven to 175°C (350°F). This specific temperature is high enough to trigger the expansion of air bubbles but low enough to prevent the exterior from browning before the leaveners have finished their work.
Grease your two 9 inch pans and line them with parchment. In your stand mixer, combine 225g of softened butter and 400g of sugar. Beat this for exactly 5 minutes until the mixture is pale and noticeably increased in volume.
2. Emulsifying the liquid phase
Add 4 large eggs to the creamed mixture one at a time. It is vital to beat well after each addition to ensure the lecithin in the egg yolks properly emulsifies the fats. Mix in the vanilla bean paste and 1 tsp of coconut extract.
The paste provides a deeper flavor profile and visual markers (the tiny seeds) that denote high-quality ingredients.
3. Integrating the dry matter
Sift together 375g flour, 1 tbsp baking powder, and 1/2 tsp salt. Alternately add the dry ingredients and 240ml of coconut milk to the mixer. Always start and end with the flour. This technique, known as the "dry wet-dry" method, prevents the batter from saturating too quickly, which would result in a dense, gummy texture.
Mix only until no streaks of flour remain.
4. Achieving the perfect bake
Divide the batter equally between the two prepared pans. Bake for 30 to 35 minutes. You are looking for a specific visual cue: the edges should just be starting to pull away from the sides of the pan. Insert a skewer into the center; it should come out clean.
Avoid opening the oven door before the 25 minute mark, as the sudden drop in temperature can cause the delicate internal structure to collapse.
5. Timing the infusion correctly
While the cakes are baking, whisk together 120ml cream of coconut, 60ml evaporated milk, and 2 tbsp whole milk. As soon as the cakes come out of the oven, use a skewer to poke holes across the entire surface. Drizzle the soak slowly over the warm layers.
The warmth of the cake reduces the viscosity of the liquid, allowing it to move deeper into the crumb.
6. Stabilizing the cream frosting
Whip 450g of cold cream cheese and 115g of softened butter until completely smooth. Gradually integrate 500g of powdered sugar, 3 tbsp of heavy cream, and 1/2 tsp of coconut extract. Whip this until the frosting is light and holds a stiff peak.
Do not over mix once the sugar is in, or you risk breaking the emulsion and creating a runny mess.
7. Creating the snow capped finish
Once the cake layers are completely cooled (this is critical for the frosting's structural integrity), place the first layer on your stand. Apply a generous layer of frosting, then top with the second cake. Frost the top and sides, then immediately press 200g of sweetened shredded coconut into the surface.
The coconut acts as a barrier, preventing the frosting from drying out.
| Original Ingredient | Substitute | Why It Works |
|---|---|---|
| All purpose flour | Cake flour | Lower protein yields a softer, more delicate crumb |
| Evaporated milk | Coconut cream | Increases fat content; results in a richer soak |
| Cream cheese | Mascarpone | Higher fat; provides a silkier, less tangy finish |
The physics of this cake are fascinating. While it's resting, the sugars in the soak are actually bonding with the water molecules, creating a "hydrogel" effect within the cake structure. This is why the cake often tastes better the next day the moisture has had time to distribute evenly through the crumb. For another experiment in dairy based texture, you might try my Carrot Cake Ice Cream recipe which uses a similar fat stabilization technique.
Structural Failure Analysis and Repairs

Cake pooling liquid troubleshooting
If you notice liquid collecting at the base of your cake, the "soak" was likely applied too late or the cake was too cold when you started. When the starch cells in the cake have already "set" and cooled, they lose their ability to absorb additional moisture.
The liquid then simply sits in the gaps between the crumb and eventually drains to the bottom.
Preventing frosting from sliding
Sliding frosting is almost always a result of thermal transfer. If the cake layers are even slightly above room temperature (approx 21°C), the butter in the frosting will begin to reach its melting point. This creates a thin layer of oil between the cake and the frosting, acting as a lubricant.
Always ensure the cake is cool to the touch before proceeding.
Addressing dense cake issues
A dense, "rubbery" cake is typically caused by over mixing the flour. When you mix flour with liquid, you develop gluten. In a cake, we want very little gluten development. If you continue to mix the batter after adding the flour, you create a tough network that traps too much air or collapses entirely under its own weight.
| Problem | Root Cause | Solution |
|---|---|---|
| Soggy bottom | Poor soak distribution | Poke more holes and pour slower |
| Crumbly texture | Under creamed butter | Beat butter/sugar for the full 5 mins |
| Frosting separation | Temperature mismatch | Ensure all frosting ingredients are room temp |
Common Mistakes Checklist
- ✓ Ensure eggs are at room temperature to maintain the fat emulsion.
- ✓ Sift the flour and baking powder together to prevent "clumps" of leavener.
- ✓ Do not over soak the edges; focus the liquid on the center where it's driest.
- ✓ Chill the frosted cake for 30 minutes before slicing to set the structure.
- ✓ Use a serrated knife for clean slices without crushing the airy crumb.
Formula Adaptations and Flavor Shifts
Scaling this recipe requires attention to the leavening agents. If you are cutting the recipe in half to make a single 9 inch layer, you can simply divide all ingredients by two. However, when doubling the recipe for a large event, do not double the salt or the extracts linearly 1.5x is usually sufficient to avoid overwhelming the delicate balance of the coconut.
For those looking to adjust the flavor profile, you can toast the shredded coconut before pressing it into the frosting. This creates a Maillard reaction on the coconut itself, adding a nutty, savory note that cuts through the sweetness of the cream of coconut.
If you need a dairy-free version, you can substitute the butter for a high-quality vegan block butter, but ensure it has a fat content of at least 80% to maintain the crumb structure.
If you want a lighter finish, do this: Replace 1/3 of the cream cheese with whipped heavy cream. Use unsweetened coconut flakes instead of sweetened shredded coconut. Reduce the sugar in the cake batter by 50g to allow the coconut flavor to shine.
Preservation and Storage Stability Guidelines
Because of the high moisture content from the soak and the dairy in the frosting, this cake must be refrigerated. It will stay fresh for up to 4 days if stored in an airtight container. The cold temperature helps the "hydrogel" in the crumb stay firm, making the cake easier to slice.
If left at room temperature for more than 2 hours, the frosting will lose its structural integrity.
You can freeze the individual cake layers before frosting. Wrap the "soaked" layers tightly in plastic wrap and then foil; they will keep for up to 2 months. When you are ready to serve, thaw them in the refrigerator overnight.
Do not thaw them on the counter, as the rapid temperature change can cause the soak to "weep" out of the crumb, leaving you with a soggy mess at the bottom of the bag.
To reduce waste, use any leftover frosting as a dip for fruit or between cookies. The toasted coconut scraps can be saved in a jar and used as a topping for morning oatmeal or yogurt.
Even if you have "failed" cake scraps that fell apart, they can be layered in a glass with a bit of whipped cream to make a spectacular coconut trifle.
Optimal Presentation and Serving Dynamics
For the most precise slices, use a long, thin serrated knife. Dip the knife in hot water and wipe it clean between every single cut. The heat from the blade will glide through the cold cream cheese frosting without dragging the coconut flakes through the delicate sponge.
I prefer to serve this cake slightly chilled, about 15 minutes after taking it out of the fridge, as this allows the flavors to "bloom" without the cake becoming too soft.
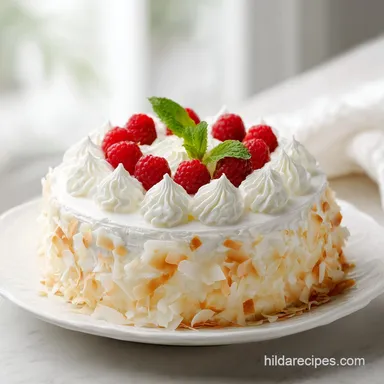
The visual appeal of this cake relies on the "snow capped" look of the coconut. If you want a more modern aesthetic, you can use large coconut ribbons instead of shredded coconut. This provides a different textural experience a "shatter" of coconut against the velvety frosting.
It is also common to serve this with a side of fresh raspberries; the acidity of the fruit provides a necessary technical balance to the high fat content of the coconut milk and cream cheese.
Why pay $15 a slice at a bistro?
When you understand the science of the soak and the precision of the creaming method, you realize that commercial bakeries often take shortcuts that you don't have to. By using high-quality vanilla bean paste and full fat canned coconut milk, you are creating a product that is denser, moister, and more flavorful than almost anything you can buy.
You aren't just baking; you are engineering a dessert that relies on physics to achieve its legendary texture.
The joy of this recipe is in the details the way the frosting grips the crumb, the way the coconut scent lingers, and the way the cake holds its shape even when saturated with flavor. It is a technical triumph that proves home cooking can be just as precise and impressive as professional pastry work.
Keep your measurements exact, watch your temperatures, and you'll have a result that is nothing short of scientific perfection.
Kitchen Myths and Misconceptions
One common misconception is that "poking holes in the cake makes it soggy." In reality, the sogginess is a result of the viscosity of the liquid, not the holes themselves. If you use a thin liquid like plain milk, it will run through the crumb and pool.
By using the thickened three milk blend we've designed, the liquid "clings" to the starch walls, creating moisture without the wetness.
Another myth is that you must use "cake flour" for a soft cake. While cake flour has less protein, our recipe uses the "creaming method" and a high fat to flour ratio to physically interfere with gluten development.
This means you can achieve a professional grade, velvety crumb using standard all purpose flour, provided you follow the 5 minute creaming rule and the dry wet-dry integration technique.

Recipe FAQs
What is the Tom Cruise coconut cake?
It refers to a specific white coconut cake often associated with the actor. While this recipe captures that classic, rich coconut profile, it focuses on a professional grade soak of cream of coconut and evaporated milk to achieve maximum moisture.
What is the 1234 cake rule?
This is a traditional ratio based method for pound cakes using one part butter, two parts sugar, three parts flour, and four eggs. If you enjoyed mastering this specific butter creaming technique, you can apply the same structural foundation to our moist lemon pound cake for consistent results.
Is coconut cream healthy or fattening?
It is calorie dense and high in saturated fat. This cake is intended as a decadent dessert, so it should be enjoyed in moderation rather than as a health food.
What is the famous coconut cake in Hawaii?
It is usually a chantilly or coconut haupia cake featuring distinct tropical flavors. Our version mirrors the local preference for using full fat canned coconut milk in both the batter and the soak for that authentic island richness.
How to prevent the cake layers from becoming soggy during soaking?
Poke holes only halfway through the depth of the cake. Focus your liquid drizzle on the center of the cake layers, as the edges will naturally absorb moisture from the center outward, preventing a mushy perimeter.
How to achieve the perfect crumb structure?
Cream your butter and sugar for the full 5 minutes until very pale. This step incorporates air into the batter, which is essential for creating the light, airy texture required before you add the eggs and dry ingredients.
How to get clean slices when serving?
Chill the finished cake for 30 minutes before cutting. Using a serrated knife with a gentle sawing motion will then allow you to cut through the coconut crusted exterior without crushing the delicate, soaked crumb.
Moist Coconut Cream Cake
Ingredients:
Instructions:
Nutrition Facts:
| Calories | 806 kcal |
|---|---|
| Protein | 7.7 g |
| Fat | 43.4 g |
| Carbs | 100.2 g |
| Fiber | 3.2 g |
| Sugar | 79.1 g |
| Sodium | 348 mg |
